目录
- 🍍 难度分析
- 🍇 项目回顾
- 🍑 最终效果演示:
- 🍌技术选型:
- 🥝 项目业务流程简介
- 🍒 项目搭建(使用模板引擎)
- 1. 首先创建Maven项目
- 2. 编写yaml配置文件
- 3. 项目初期基本搭建
- ①异常处理
- ② 拦截器
- 4. 编写Controller前端控制器代码
- ① 跳转文件上传的页面
- ② 实现文件上传的功能
- ③ 实现多文件上传功能
- 5. 项目优化
- ① 导入依赖
- ② yaml配置
- ④ Redis序列化处理
- ③ 优化处理
- ④ Redis查看
- 6. 注意事项
🍍 难度分析
虽然但是听到这个消息的时候,内心还是挺震惊的,毕竟是一个完整的管理系统,功能界面还不能太过简陋。而且从数据库设计到整个系统的交付全由自己一人完成,挑战效果直接拉满!但是冷静下来思考一下,其实也并不是很难,整体的项目流程即为:设计——>文档——>编码——>交付。整体的流程划清之后,就开始一步步从无到有的实现,没想到到最后一步的时候,我竟然才用一天半的时间!!后面又用了半天的时间对整体的项目做了一个优化处理!
🍇 项目回顾
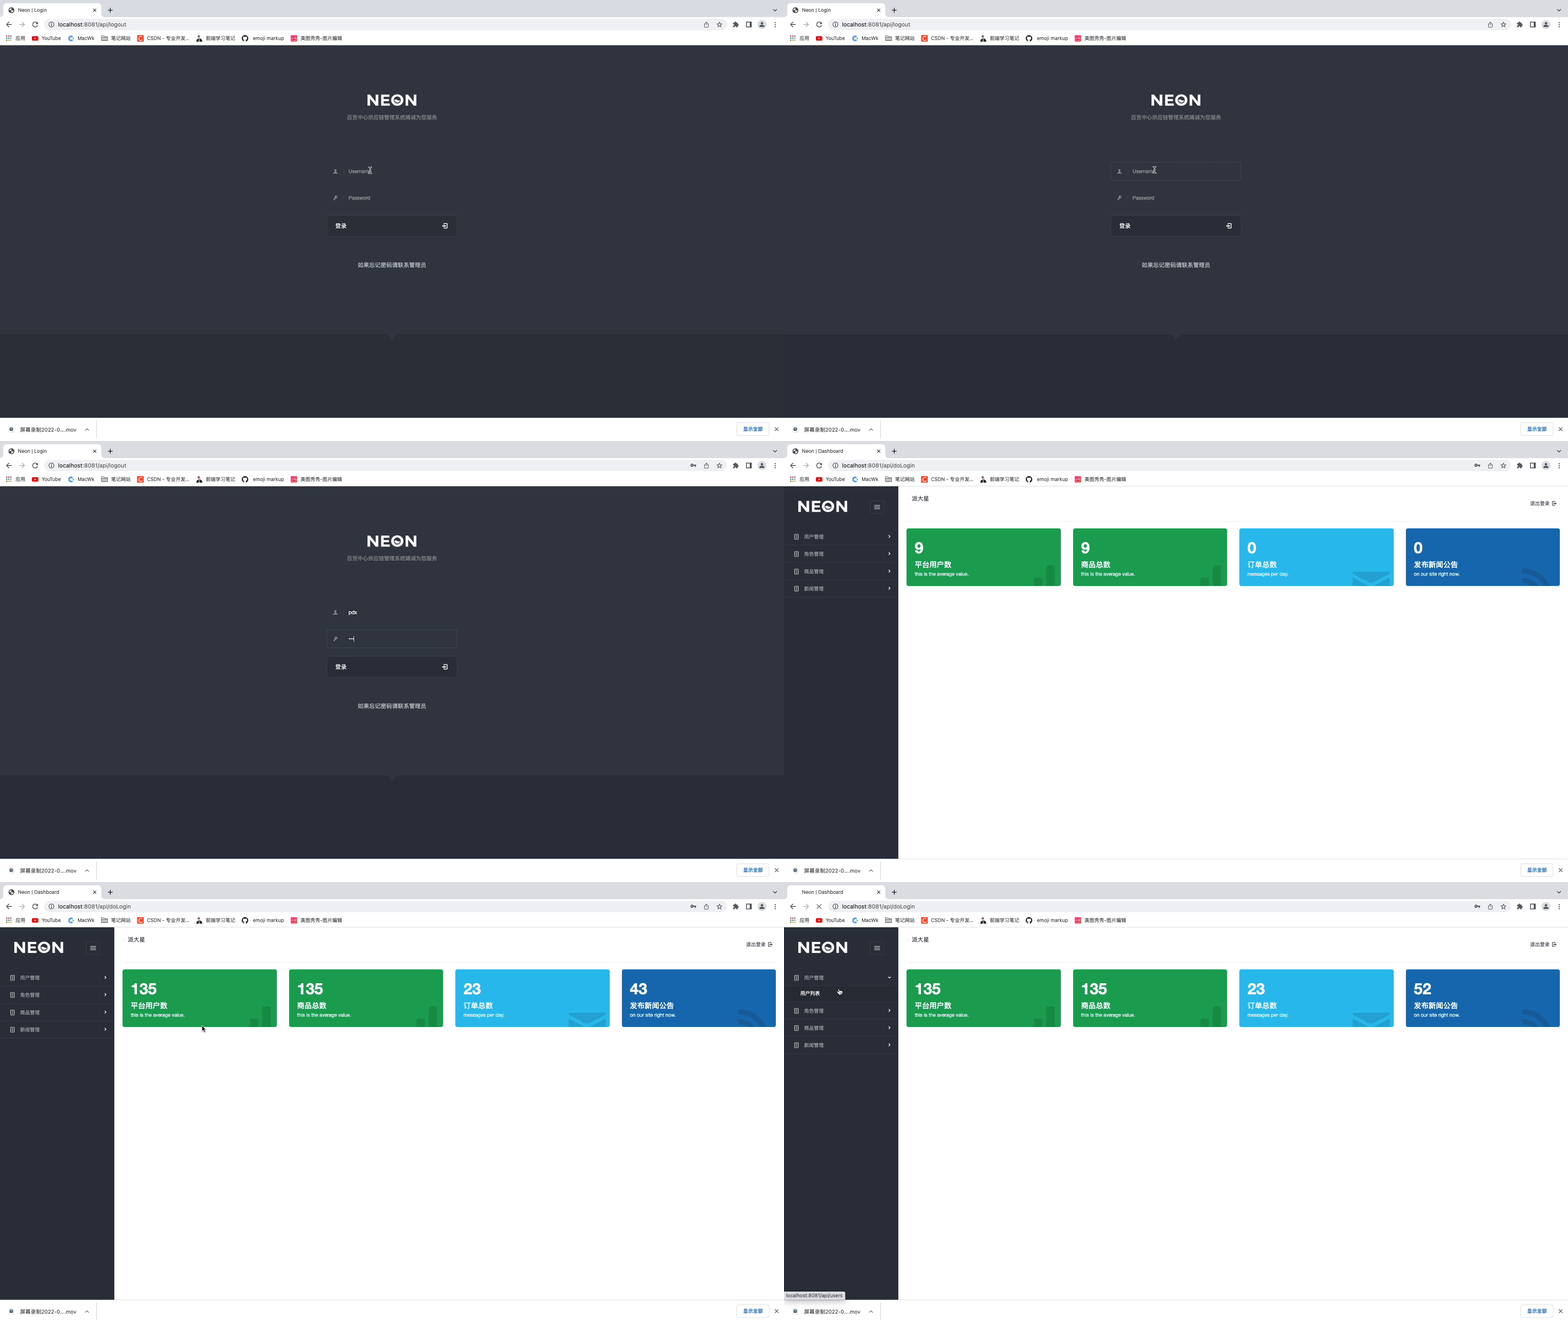
🍑 最终效果演示:
🍌技术选型:
- 🍁 SpringBoot
- 🍃 Thymeleaf
- 🍂 Mybatis-Plus
- 🌿 MySQL
- 🍄 PageHelper
- 🌵 Lombok
- 🌴 Redis(后期页面优化使用)
🥝 项目业务流程简介
登录模块、用户模块管理以及对用户的角色分配,新闻公告模块的管理、商品模块(包括对商品、商品分类、订单)的管理、角色模块的管理;对于前端某资源是否有权限操作该资源,使用的是thymeleaf模板语法进行判断鉴别以及文件上传等基本功能。
🍒 项目搭建(使用模板引擎)
1. 首先创建Maven项目
引入相应的依赖,构建所需文件目录
![[外链图片转存失败,源站可能有防盗链机制,建议将图片保存下来直接上传(img-pSr5BJuu-1651898181791)(/Users/wumao/docu<i></i>ments/Typora笔记/typora-user-images/image-20220507110514539.png)]](https://www.guangfuqiang.com/file/upload/202205/11/080625581.png)
![[外链图片转存失败,源站可能有防盗链机制,建议将图片保存下来直接上传(img-yFKPALe7-1651898181792)(/Users/wumao/docu<i></i>ments/Typora笔记/typora-user-images/image-20220507110657885.png)]](https://www.guangfuqiang.com/file/upload/202205/11/080625221.png)
2. 编写yaml配置文件
server: port: 8080spring: datasource: driver-class-name: com.mysql.cj.jdbc.Driver url: jdbc:mysql://localhost:3306/supplier?useUnicode=true&characterEncoding=utf8&serverTimezone=GMT%2B8 username: root password: root # thymeleaf 配置 thymeleaf: # 关闭缓存 cache: false prefix: classpath:/templates/mybatis-plus: mapper-locations: classpath*:/mapper*.xml3. 项目初期基本搭建
在搭建一个项目的初期,为了让系统显得更规范化,我一般会提前做好基础的配置和声明,一个项目从开始设想时所涉及到技术以及这些技术对应的一些基础配置,都要提前规划清楚(个人习惯)。比如:异常处理、拦截器、过滤器、常量类等等。
①异常处理
@ControllerAdvicepublic class ExceptionHandler { private final org.slf4j.Logger logger = LoggerFactory.getLogger(this.getClass()); @org.springframework.web.bind.annotation.ExceptionHandler(Exception.class) public ModelAndView exception(HttpServletRequest request, Exception e ) throws Exception { logger.error("Request URL:{},Exception:{}",request.getRequestURL(),e); if (AnnotationUtils.findAnnotation(e.getClass(), ResponseStatus.class )!= null){ throw e; } ModelAndView mv = new ModelAndView(); mv.addObject("url",request.getRequestURL()); mv.addObject("exception",e); mv.setViewName("error/error"); return mv; }}② 拦截器
拦截器主要是对一些资源做的处理,类似于某些资源需要用户登录后才能访问的,某些是不需要的,比如:登录功能就不需要有所拦截,而对用户的各种管理就需要添加拦截操作,这样才能使系统的安全性有所提高。
登录拦截
public class LoginInterceptor extends HandlerInterceptorAdapter { @Override public boolean preHandle(HttpServletRequest request, HttpServletResponse response, Object handler) throws Exception { if (request.getSession().getAttribute("user") == null){ response.sendRedirect("/api"); return false; } return true; }}资源放行
@Configurationpublic class WebConfig extends WebMvcConfigurerAdapter { @Override public void addInterceptors(InterceptorRegistry registry) { registry.addInterceptor(new LoginInterceptor()) .addPathPatterns("/api/**") .excludePathPatterns("/api","/api/doLogin"); }}4. 编写Controller前端控制器代码
首先创建一个FileController类
① 跳转文件上传的页面
//跳转文件上传的页面@RequestMapping("/file-upload")public String userList(){ return "file-upload";}② 实现文件上传的功能
@RequestMapping("/doAddForUser")public String doAdd(User user, @RequestParam("file") MultipartFile files, HttpServletRequest request) throws IOException { //String path = null; if (files != null && !files.isEmpty()){ String name = UUID.randomUUID().toString().replace("-",""); //获取文件的扩展名 String ext = FilenameUtils.getExtension(files.getOriginalFilename()); //设置文件上传的路径 String url =request.getSession().getServletContext().getRealPath("/upload/"); File file = new File(url); if (!file.exists()){ file.mkdir(); } //测试路径 System.out.println(request.getServletPath()+ "/upload"); System.out.println(request.getContextPath() + "/upload/"); //以绝对路径保存重命名后的文件 files.transferTo(new File(url+"/"+name+"."+ext)); user.setAvatar(request.getContextPath() + "/upload/"+name+"."+ext); } user.setId(UUID.randomUUID().toString()); String salt = PasswordUtils.getSalt(); String password = user.getPassword(); String encode = PasswordUtils.encode(password, salt); user.setSalt(salt) ; user.setPassword(encode); user.setCreateTime(new Date()); userService.save(user); return "redirect:/api/users";}注: 如何想要实现多文件上传需要更改的地方如下:
![[外链图片转存失败,源站可能有防盗链机制,建议将图片保存下来直接上传(img-RaebdJda-1651898181792)(/Users/wumao/docu<i></i>ments/Typora笔记/typora-user-images/image-20220507114014754.png)]](https://www.guangfuqiang.com/file/upload/202205/11/080625931.png)
③ 实现多文件上传功能
在这个项目中并未实现多文件上传功能
private void commons(Object obj, @RequestParam("file") CommonsMultipartFile[] files, HttpServletRequest request) throws IOException { //String path = null; for (int i = 0; i < files.length; i++) { if (files[i] != null && !files[i].isEmpty()){ String name = UUID.randomUUID().toString().replace("-",""); //获取文件的扩展名 String ext = FilenameUtils.getExtension(files[i].getOriginalFilename()); //设置文件上传的路径 String url =request.getSession().getServletContext().getRealPath("/upload/"); File file = new File(url); if (!file.exists()){ file.mkdir(); } //测试路径 System.out.println(request.getServletPath()+ "/upload"); System.out.println(request.getContextPath() + "/upload/"); //以绝对路径保存重命名后的文件 files[i].transferTo(new File(url+"/"+name+"."+ext)); if (i == 0){ obj.setUrl1(request.getContextPath() + "/upload/"+name+"."+ext); } if (i == 1){ obj.setUrl2(request.getContextPath() + "/upload/"+name+"."+ext); } if (i == 2){ obj.setUrl3(request.getContextPath() + "/upload/"+name+"."+ext); } if (i == 3){ obj.setUrl4(request.getContextPath() + "/upload/"+name+"."+ext); } if (i == 4){ obj.setUrl5(request.getContextPath() + "/upload/"+name+"."+ext); } } }}5. 项目优化
对于前后端不分离的项目,多数使用的是页面缓存优化,当系统某一瞬间遭受巨大流量时,当第一个用户进行页面访问时可以将该页面数据进行缓存,这样,后来的用户访问到的页面都是从缓存中获取的,这样就减少了 对数据库的操作,减轻了数据库的压力,从而达到优化的处理。
① 导入依赖
<!--Redis--><dependency> <groupId>org.springframework.boot</groupId> <artifactId>spring-boot-starter-data-redis</artifactId></dependency><!--commons-pools2 对象池依赖--><dependency> <groupId>org.apache.commons</groupId> <artifactId>commons-pool2</artifactId></dependency>② yaml配置
## Redis配置 redis: # 服务器地址 host: localhost # 端口 port: 6379 # 数据库 database: 0 # 超时时间 connect-timeout: 10000ms lettuce: pool: # 最大连接数 max-active: 8 # 最大连接阻塞等待时间 默认 -1 max-wait: 10000ms # 最大空闲时间 默认8 max-idle: 200 # 最小空闲连接 默认8 min-idle: 5④ Redis序列化处理
@Configurationpublic class RedisConfig { @Bean public RedisTemplate<String,Object> redisTemplate(RedisConnectionFactory redisConnectionFactory){ RedisTemplate<String,Object> redisTemplate = new RedisTemplate<>(); //key序列化 redisTemplate.setKeySerializer(new StringRedisSerializer()); //value序列化 redisTemplate.setValueSerializer(new GenericJackson2JsonRedisSerializer()); //hash类型key的序列化 redisTemplate.setHashKeySerializer(new StringRedisSerializer()); //hash类型value的序列化 redisTemplate.setHashValueSerializer(new GenericJackson2JsonRedisSerializer()); redisTemplate.setConnectionFactory(redisConnectionFactory); return redisTemplate; }}③ 优化处理
@Autowired private NewsService newsService; @Autowired private RedisTemplate redisTemplate; @Autowired private ThymeleafViewResolver viewResolver; @RequestMapping(value = "/news",produces = "text/html;charset=utf-8") @ResponseBody public String roles(Model model, @RequestParam(value = "pageNo",defaultValue = "1")Integer pageNo , @RequestParam(value = "pageSize",defaultValue = "10")Integer pageSize , HttpServletRequest request, HttpServletResponse response){ //Redis中获取页面,如果不为空,则直接返回页面 ValueOperations valueOperations = redisTemplate.opsForValue(); String html = (String) valueOperations.get("news-list"); if (!StringUtils.isEmpty(html)){ return html; } PageHelper.startPage(pageNo,pageSize); List<News> list = newsService.list(); PageInfo<News> pageInfo = new PageInfo<>(list); model.addAttribute("news",list); model.addAttribute("pageInfo",pageInfo); //如果为空,手动渲染,存入Redis中并返回 WebContext context = new WebContext(request, response, request.getServletContext(), request.getLocale(), model.asMap()); html = viewResolver.getTemplateEngine().process("news-list", context); if (!StringUtils.isEmpty(html)){ //给缓存设置过期时间 valueOperations.set("news-list",html,60, TimeUnit.SECONDS); } return html; }④ Redis查看
![[外链图片转存失败,源站可能有防盗链机制,建议将图片保存下来直接上传(img-hZd4S31W-1651898181792)(/Users/wumao/docu<i></i>ments/Typora笔记/typora-user-images/image-20220507121029823.png)]](https://www.guangfuqiang.com/file/upload/202205/11/080625171.png)
6. 注意事项
-
注意
@Controller和@RestController的区别,本项目使用的是模板渲染页面,而@Controller就是用来响应页面的;而@RestController是用来返回Json -
在项目优化阶段需要在方法上添加注解
@ResponseBody,因为我们是将整个页面进行缓存 ,所以要将页面转换成JSON进行存储。
![[外链图片转存失败,源站可能有防盗链机制,建议将图片保存下来直接上传(img-seotbkvr-1651898181792)(/Users/wumao/docu<i></i>ments/Typora笔记/typora-user-images/image-20220507122521057.png)]](https://www.guangfuqiang.com/file/upload/202205/11/080625321.png)
-
注入Thymeleaf解析器,将具体的 页面进行解析成
Json字符串进行存储
![[外链图片转存失败,源站可能有防盗链机制,建议将图片保存下来直接上传(img-3qbGjfEd-1651898181792)(/Users/wumao/docu<i></i>ments/Typora笔记/typora-user-images/image-20220507122734629.png)]](https://www.guangfuqiang.com/file/upload/202205/11/080625491.png)
![[外链图片转存失败,源站可能有防盗链机制,建议将图片保存下来直接上传(img-bp8dZ78Z-1651898181793)(/Users/wumao/docu<i></i>ments/Typora笔记/typora-user-images/image-20220507122856798.png)]](https://www.guangfuqiang.com/file/upload/202205/11/080625941.png)
-
将存入Redis中的数据加上过期时间,因为页面中的数据要和数据库保持一致,如果用户看到是几十秒之前或一分钟之前的数据还是勉强可以接受的。
![[外链图片转存失败,源站可能有防盗链机制,建议将图片保存下来直接上传(img-Nt3O3qvl-1651898181793)(/Users/wumao/docu<i></i>ments/Typora笔记/typora-user-images/image-20220507123528961.png)]](https://www.guangfuqiang.com/file/upload/202205/11/080625271.png)
目前代码已经同步到 派大星百货中心管理系统
如果有需要的自行前去仓库拉取,还请各位大佬不要吝啬手中的三连哟!

免责声明:本平台仅供信息发布交流之途,请谨慎判断信息真伪。如遇虚假诈骗信息,请立即举报
举报